
Partner disclosure: SewingInsight.com is a participant in the Ebay Partner Network and Amazon Services LLC Associates Program. We earn a small advertising fees by linking to products on Ebay and Amazon. This does not increase the price for you as a reader but you will support our small business.

How to Make a Barn Quilt?
Hello! Have you ever driven through Iowa and been captivated by the beautiful barn quilts? I certainly was! On my latest trip, I felt inspired to make one of my own.
Inspired by the splash of colors, I decided to try my hand at making one and hanging it in my backyard. Turns out, you can add a barn quilt to almost anything you can think of – your fence, garden shed, workshop, or even the side of your house. The possibilities are endless!
So join me in creating your very own barn quilt masterpiece!
What is a barn quilt?
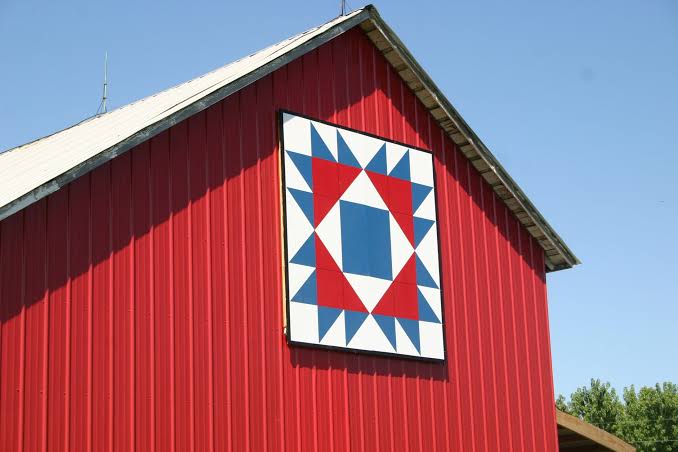
A barn quilt is essentially a sizable wooden board painted to resemble a quilt block, serving as an outdoor display. Similar to hand-stitched quilts, barn quilts convey a narrative. They are super easy to make and are quite captivating.
What you’ll need?
1. Plywood or exterior-grade MDO board (trim it down to a 4-foot square in the store, or adjust the size as per your preference)
2. Sandpaper (medium and fine grit)
3. Primer
4. Exterior paint in colors of choice (acrylic or latex)
5. Painter’s tape
6. Measuring tape and pencil
7. Ruler or straight edge
8. Paint brushes or rollers in various sizes
9. Clear sealant (polyurethane or outdoor varnish)
10. Hanging hardware (preferably 2×4’s to brace the back for hanging)
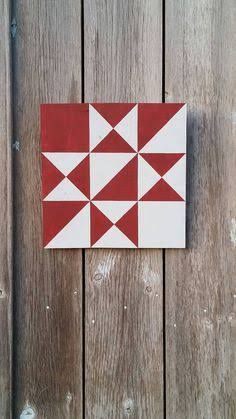
11. Pattern (I’ll be using the Ohio Star pattern for my barn quilt. Recreating this pattern is straightforward since it involves basic straight lines—no specific design required, just basic measurements)
The Ohio Star pattern looks like this:
Steps to Make a Barn Quilt
Step 1: Prepare the Board
Cut the plywood or MDO board to your desired size for the barn quilt. Sand the surface with medium grit sandpaper to create a smooth base.
Step 2: Prime the Surface
Apply a coat of primer to the entire board. This helps the paint adhere better and provides a consistent base.
Step 3: Apply Base Coat
Choose a base color for your barn quilt and paint the board with two coats. I like to keep it simple with no borders. Allow it to dry completely.
Step 4: Design Planning
Plan your quilt design on paper or using design software. Transfer the design onto the primed board using a pencil and ruler for accuracy.
If you’re planning to design the Ohio Star pattern like me, follow these steps:
Create the Ohio Star pattern by dividing the board into thirds, drawing straight lines horizontally and vertically, and connecting corners with diagonal lines to form a star. Finally, apply a contrasting color to complete the pattern.
Step 5: Tape Off Sections
If you’re using a complicated pattern, use painter’s tape to outline the sections of your design. Press the edges of the tape firmly to prevent paint bleed.
Tip: You don’t need perfect edges; keep in mind that the quilt will be displayed on a building, so minor mistakes won’t be noticeable.
Step 6: Painting
Paint each taped-off section with the desired colors. Use acrylic or latex paint for exterior durability. Allow each color to dry before moving on to adjacent sections to prevent smudging.
Tip: Painting is the most time-consuming part as you must wait for each coat to dry before applying the next. Aim for at least four coats for optimal results.
Step 7: Remove Painter’s Tape
Carefully remove the painter’s tape once all sections are dry to the touch.
Perform any necessary touch-ups or corrections with a small brush.
Step 8: Seal the Quilt
Apply a clear sealant over the entire barn quilt to protect it from the elements. Choose a polyurethane or outdoor varnish for durability.
Step 9: Allow to Cure
Let the barn quilt cure completely for several days before handling or hanging.
Step 10: Hanging (Optional)
If you plan to hang the barn quilt, attach hardware to the back according to your desired hanging method.
Now you have a beautifully crafted barn quilt ready to adorn your space or be displayed in a barn!
How to Hang a Barn Quilt?
First, choose a suitable location with enough space to showcase the quilt. Ensure the surface is clean and dry before proceeding.
Start by gathering the necessary materials, including appropriate hanging hardware, such as screws, washers, and a level.
Next, measure the dimensions of the barn quilt to determine the placement on the chosen surface.
Now, position the quilt on the wall and use a level to ensure it’s straight. Mark the desired placement with a pencil.
Tip: If the quilt is heavy, consider using anchors for added support.
Pre-drill holes into the marked spots, keeping them slightly smaller than the screws to ensure a snug fit.
Attach the hanging hardware to the back of the barn quilt, following any specific instructions provided with the hardware.
Once attached, align the hardware with the pre-drilled holes and secure the quilt to the wall using the screws and washers.
Double-check the alignment and straightness before tightening the screws fully. Take your time to ensure the barn quilt is securely and evenly mounted.
Check out this video to have a more clear understanding:
Summary
Start making your own barn quilt now! Pick a cool design, get a wooden board, and have fun painting it. You don’t need to be an expert—just enjoy being creative! It’s a fun and easy way to make something special for your space. So, grab some paint and let your imagination do the talking!
Also, make sure to share your masterpiece with me in the comments section below.
Frequently Asked Questions
Q. What materials do I need to make a barn quilt?
Ans. To make a barn quilt, you’ll need exterior-grade plywood, paint, painter’s tape, a primer, a clear sealant, a pencil, a ruler, and a paintbrush.
Q. How do I choose a design for my barn quilt?
Ans. Select a design that suits your taste and complements the surrounding environment. You can find inspiration online, in quilt patterns, or create your own unique design.
Q. Do I need artistic skills to make a barn quilt?
Ans. No special artistic skills are required. Simple geometric shapes and patterns are often used in barn quilts, and you can use stencils or templates to help create precise designs.
Q. What is the best way to hang a barn quilt on my barn or outdoor space?
Ans. Ensure your barn quilt is properly sealed with a clear sealant for outdoor use. Attach a sturdy frame to the back for support and use weather-resistant screws or hooks to hang it securely on your chosen location.
Q. How long does it take to make a barn quilt?
Ans. The time it takes depends on the complexity of your design and the drying time between paint layers. On average, it may take a few days to complete a barn quilt, allowing for drying and sealing processes.
If you are an advanced sewist, have a look at our best sewing machines, best sewing books and best sewing magazines posts and if you are looking to get a mechanical, heavy duty, quilting or industrial sewing machine, have a look at some of our great articles. If you are a beginner sewist, review our best sewing books for beginners, best sewing machines for beginners and best sewing machines under $200 to get started.
For brand related articles, check Best Bernette | Best Bernina | Best Brother | Best Husqvarna Viking | Best Janome | Best Juki | Best Singer |
For best accessories, check Best Chairs | Best tables | Best tracing paper | Best machine oils | Best scissors and shears | Best presser feet | Best needles | Best sewing kits |
Happy Stitching.


